Planning a long-distance thru-hike through the John Muir Trail can be a daunting task. It’s a trail that takes about three weeks to complete, so it’s not like you can just grab a few things and be on your way.
Between gear, food, itineraries, and the necessary permit, it’s hard to know where to start. Before pulling out your hair from the frustration of it all, follow this ultimate guide on hiking the John Muir trail. It takes you through everything you need to know about the trail, including how to fill out your permit and prepare your itinerary.
A little bit of organization goes a long way when planning a trip of this nature, so stop fretting and start planning your big backpacking adventure on the John Muir Trail.

The John Muir Trail (JMT) is named after founding member and original president of the Sierra Club, naturalist John Muir. The trail was started in 1915, a year after Muir’s death, and was completed 46 years later.
In order to hike the JMT, you need considerable training and planning. Thru-hikers generally take around three weeks to cover the whole distance, and there are no direct road crossings from Reds Meadow to Whitney Portal. This remoteness means that throughout your entire journey, you’ll encounter next to no civilization; it will be just you and uninterrupted wilderness (plus your fellow thru-hikers).
The southern terminus is on the top of Mount Whitney, the tallest peak in the lower 48 states, so to get to the closest trailhead, Whitney Portal, you’ll need to add 11 more grueling miles to your already long hike (but trust us – it’s definitely worth it).
The JMT is the premier hiking trail in the U.S. and is considered by most to pass by some of the finest mountain scenery in the U.S. This area has everything you can imagine, including 14,000-foot peaks, thousands of lakes, granite cliffs, and canyons. Luckily for through hikers, the Sierra Nevada mountains are also blessed with the sunniest and mildest climate of any major mountain range on earth.
Where does the JMT start?
The John Muir Trail starts in Yosemite Park, ranked third in the Top Ten Most Visited National Parks by National Geographic. The trail continues for 215 miles, crossing the Ansel Adams Wilderness and the Sequoia and King’s Canyon National Parks, ending in Mt.Whitney, the tallest peak in the U.S., at 14,469ft.
Should I hike the John Muir Trail north or south?
While north to south is the most popular option, both ways offer the same fantastic scenery and adventure. Hiking north to south will mean you will have to tackle the most rugged and highest stretches at the end of your hike, not at the beginning. Starting at the south will mean you’ll be faced with climbing to the summit of Mount Whitney at the very start.
How many miles is the John Muir Trail?
The JMT is 211 miles long, running mostly in conjunction with the Pacific Crest Trail. The southernmost trailhead starts at Yosemite Valley and ends in Mount Whitney in California. The trail winds down the Sierra Nevada mountains, and it visits some of the best national parks in the U.S., including Ansel Adams and John Muir Wildernesses, and Sequoia and Kings Canyon National Parks.
How long does it take to do the JMT?
You can hike the JMT in as little as ten days, but to do so, you would need to trek around a grueling 30 miles a day. The recommended time frame is around three weeks to complete, which gives you the time to fully explore the area, take some rest breaks and be able to jump into one of the many lakes to cool off.
Are dogs allowed on the John Muir Trail?
Dogs and pets are allowed in the John Muir and Ansel Adams Wilderness areas, but they are not allowed in national parks. A lot of the JMT goes through Yosemite, King’s Canyon or Sequoia National Parks, where dogs are not allowed, meaning that you can’t even start the trail with your dog.
As well as the outset, most of the second half of the trail goes through national parks where dogs are prohibited from the entire trail. If you are found to have a dog by a ranger, they will write you a ticket, and you could be escorted out of the park.
When is the best time to hike the John Muir Trail?
The trail is generally accessible from July to September, though it varies each year, depending on the amount of snowfall from the previous winter. Hiking the JMT is recommended from late August to early September, when conditions are best. There is less chance of rain, with nicer weather, and cooler evenings.
Snow can start falling at the beginning of fall, so be aware that if you are hiking the JMT during October, some supply relocations will be closed, the nights will be cold, and there is an increased risk of dangerous amounts of snowfall.
Filling Out Your John Muir Trail Permit Application
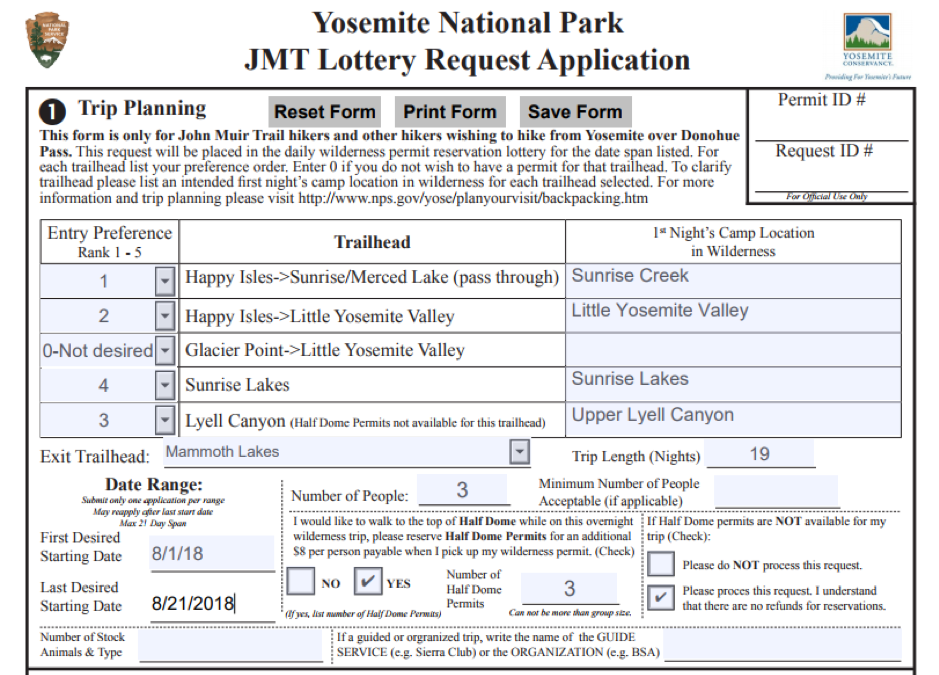
When filling out your permit application request, you must state your desired trailhead, entry date, the location of your campsite for the first night, the length of your trip, the exact number of people in your group, your exit trailhead, and if you are also applying for a Half Dome permit. As an example for you to follow, we filled out the application below.
Choosing Your Date Range
As previously mentioned, one of the biggest changes made recently, in 2017, is that if you have a flexible start date, you can submit all of your dates in one application, instead of having to send multiple applications.
So if, for example, you can start the JMT anytime during the first three weeks in August, your first preferred start date would be listed as 8/1/18 and your last preferred starting date would be 8/21/18. Entering multiple dates means you will be automatically entered into the August 2nd lottery if you were unsuccessful for the August 1st lottery, and so on and so forth. If you were lucky enough to score a permit, you will be notified via email.
Choosing Your JMT Entry Trailhead
There are various trailheads in Yosemite where you can begin the JMT. In order to get a permit, the best thing is for you to be flexible on your trailhead, as you can now list all your preferred access points in your application in order preference. Any trailhead that you’re not interested in can be ranked as 0.
Depending on where you begin, the start of your JMT journey can vary significantly. We’ve made a rundown of all the trailhead options below.
Happy Isles
The most popular north-to-south JMT route starts at the Happy Isles Trailhead in Yosemite Valley, meaning that this is the toughest trailhead in regard to scoring a permit. Starting here means you’ll be faced with an arduous climb right at the onset, but this route will take you through some of the most famous landmarks Yosemite has to offer, including Vernal Falls, Nevada Falls, and the Half Dome junction. Be sure and tick the box if you are aiming to climb Half Dome, as you need a separate permit for that.
Sunrise Lakes
This trailhead starts at Tenaya Lake, west of Tuolumne Meadows. Choosing this trailhead offers several advantages, especially if you’ve previously hiked Half Dome, which isn’t a very viable option if you’re starting at Sunrise Lakes. Starting here will mean you can hike to Clouds Rest on your first day, for which you don’t need an extra permit.
Another upside – for some – of entering the JMT at Tenaya Lakes is that you can park your car at the Ranger station in Tuolumne Meadows. There is a park shuttle which you can take to the start of the trail, and you will also travel with your car on day 3. While some may believe this to be a disadvantage, you can use your car for storage (making sure any food is properly stored in bear canisters), and drop off any gear you’ve deemed useless.
Glacier Point
In the past, this trailhead which passes by Vernal Falls and provides you with some incredible scenic panoramas of Yosemite Valley, was the starting choice for a lot of hikers as it meant an easier way to score a permit.
This might not be the case now with the new process, but an advantage of entering the JMT from this trailhead is that you get a different viewpoint and you start at a higher altitude, meaning you avoid having to climb the Happy Isles area. A downside is that the trailhead is about an hour away from Yosemite Valley Ranger Station, which you need to visit to get your permit.
Lyell Canyon
There are several reasons why you might want to choose this as your access point. One, you bypass the steep climb when leaving Yosemite Valley, and your first day is easy and flat. Two, there’s a chance it’s simpler to get a permit.
One significant disadvantage of entering the JMT through Lyell Canyon is that you won’t get to see Cathedral Lakes, which is some of the most spectacular scenery in Yosemite.
Choosing Your Trip Length and Exit Trail
The total number of days you’re planning on spending on the trail needs to be listed on your application as your journey length. After the exit date stated on your permit, you need to leave the trail, but you are allowed to finish early. Therefore, we recommend you give yourself some elbow room and be flexible with your end date.
If you aim to hike the complete JMT, then your exit trailhead in your permit application should be Whitney Portal. An additional permit is not required to summit Mount Whitney.
Where and When To Submit Your John Muir Trail Permit Application
The permit application process lottery starts exactly 168 days (or 24 weeks) before the season starts, and you can send in your application up to two days before the lottery. Your application needs to be faxed to (209) 372-0739 or submitted via an online fax program.
If Your JMT Permit Request is Unsuccessful
Your options are pretty limited if you don’t get a permit, as there are no longer any more walk-up permits available for the Glacier Point, Sunrise Lakes, or Happy Isles trailheads. There are 10 daily walk-up permits available from the Tuolumne Ranger’s station for the Lyell Canyon Trailhead, but people are sleeping outside the station to receive permits, so the chances of getting a walk-up permit are pretty slim.
A good backup plan is to begin the John Muir Trail somewhere south of Yosemite. This linkhas a list of all trailheads and their corresponding agencies where you can get permits. You might be adamant on hiking the entire trail in one go, but you can still have a fantastic adventure even if you don’t experience the Yosemite portion of the trail.
There are several excellent JMT map sets. A great resource is the PCTA maps and guides page. Another good resource is Halfmile’s topo maps and phone apps, which are regularly updated and show lots of detail.
JMT books and maps can also be found in many REI stores around the country. A guidebook that is always highly recommended is John Muir Trail: The Essential Guide to Hiking America’s Most Famous Trail, by Elizabeth Wenk.
Create An Itinerary
The first thing you need to do when planning your route is to note the characteristics of the JMT and work out how many miles you plan to walk each day. When thinking of your desired itinerary, keep in mind what you want your days to look like. Are you going for a speed record, or would you like some long breaks and slow starts?
We recommend buying your trail guide books and maps before you start your trip, and make notes of any particular spots you want to visit, any side hikes you are interested in, and your desired campsites. Then, get a general idea of the number of days you’ll be spending on the trail, and how long it will take you to reach each resupply point.
There’s no need to choose your exact campsite ahead of time because inevitably, your plans will change and you won’t cover as much distance as you’d expect some days, be it due to inclement weather or you deciding to take a long break when you stumble across an inviting and tantalizing lake. On other days, you may cover a lot more miles than expected, so build some flexibility into your overall plan to make sure you get the most out of your experience.
A few topics that you need to take into consideration while creating an itinerary are the following:
Mileage and Elevation
Think about how long you want to take to complete the trail, which will then help you determine how long you need to plan to walk each day, and what your daily elevation gain will be.
As an example, if you want to complete the JMT in two weeks, then you need to cover around 20 miles a day. Once you know your average distance, look at a few maps and elevation charts, and plot your daily itinerary, including possible campsites.
The JMT is 211 miles long from Yosemite Valley to Mount Whitney, plus a further 11 miles to Whitney Portal. A breakdown of the daily average daily mileage depending on trip length is as follows:
- 7 days: 31.5 miles/day
- 10 Days: 22.1 miles/day
- 14 Days: 15.7 miles/day
- 20 Days: 11 miles/day
- 25 Days: 8.8 miles/day
Elevation and Acclimatization
A lot of the JMT is at high altitude, so you need to train at elevation to acclimatize yourself before starting your hike. If you can’t train at elevation, you should try to get to Yosemite a few days in advance and prepare yourself for the altitude, as it’s harder to breathe at higher elevations.
Trail Conditions
When putting together your itinerary, you need to consider trail conditions. A lot of the first half of the JMT is a single-track dirt trail, turning more rugged in the second half as you enter the higher elevations of the Southern Sierra.
Food Resupply Locations
Camping is allowed almost everywhere on the JMT, and you only need to determine where you will be camping the first night, which needs to be included in your application. After the first night, you can set up camp wherever your itinerary takes you.
There are only a few designated campgrounds on the John Muir Trail; and if you are setting up your own campsite, you just need to make sure you follow all camping regulations. The only places you must camp at the designated campgrounds are the Little Yosemite Valley area and High Sierra Camps.
Even though we encourage you not to plan out exactly where you’ll be camping every night, there are some camping spots that you won’t want to miss.
REIhas put together a great list of all the essential gear that you’ll need for thru-hiking the JMT. The key to packing is making sure all your items are as light as possible, while still ensuring you have all the essentials to be comfortable.
Your essentials need to include warm clothing for the cold nights, a stable tent, necessary first aid supplies, rain gear and an efficient stove. There’s no reason to pack a lot of clothes; 3 pairs of shirts, underwear, and socks should be sufficient.
Before heading out on the trail, test everything out, especially if you have purchased any new gear. Set up your tent in your living room, and wear your boots or running shoes on several practice hikes.
Now that you’ve done all the hard work and everything is planned, it’s time to pack up and get going! The last detail to take care of is transportation. You can arrange to be dropped off at the trailhead and picked up at your exit location, or if possible, take two cars and park one at the start and one at the end.
We suggest you spend the night before your hike at one of Yosemite’s established campgrounds, giving yourself a chance to review your gear, make an inventory, split up any items amongst your group and maybe even take one last practice hike.
Remember that this journey is all about having a fantastic experience. Take your time to soak up the incredible views, stargaze, take loads of pictures and embrace each moment the trail has to offer.